
Vinyl siding is a popular choice among homeowners for its durability, affordability, and low maintenance. If you’re embarking on a home improvement project that involves installing or replacing vinyl siding, you might need to cut it to fit specific areas of your house. Don’t worry; cutting vinyl siding can be a straightforward process when you follow the right steps. In this guide, we’ll walk you through the process of cutting vinyl siding in eight easy-to-follow steps. Let’s get started!
Inside this blog:
- The 8 easy steps for how to cut vinyl siding like a real professional
- Bonus tips + tricks for an effective DIY vinyl siding cutting
Keep reading to find out how you can cut vinyl siding yourself in 8 actionable steps!
🔨 Tools You’ll Need 🔨
Before we dive into the steps, let’s gather the necessary tools:
- Tape measure: For accurate measurements.
- Chalk line: To mark straight cutting lines.
- Utility knife: For scoring and cutting the vinyl siding.
- Tin snips: For making precise cuts around corners and edges.
- Circular saw with a fine-tooth plywood blade: Ideal for long, straight cuts.
- Safety gear: Gloves and safety glasses to protect yourself during the process.
Now that you have your tools ready, let’s proceed with the 8 easy steps.
Step 1: Measure Twice, Cut Once
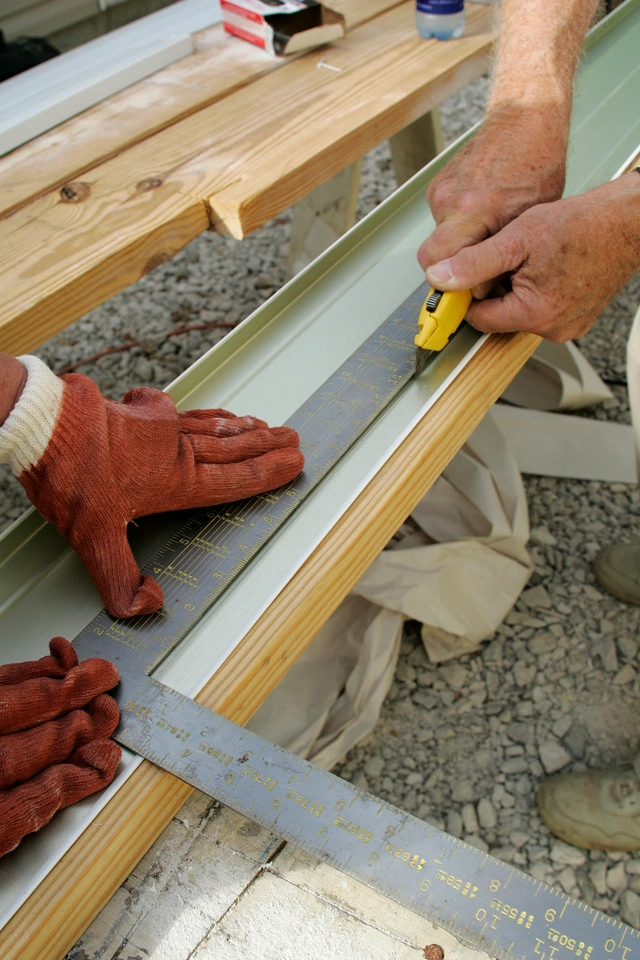
Accurate measurements are crucial when cutting vinyl siding. Use a tape measure to measure the length or width of the area you need to cover. Measure twice to ensure precision and avoid costly mistakes. Mark the measurements on the siding with a pencil or chalk to guide your cuts.
Step 2: Prepare the Chalk Line
To create straight cutting lines on your vinyl siding, prepare a chalk line. Snap a chalk line along the marked measurements. This will serve as your cutting guide, ensuring clean and precise cuts.
Step 3: Score the Vinyl Siding
Using a utility knife, score the vinyl siding along the chalk line you’ve created. Apply firm pressure to make a deep and even cut. This score will act as a guide for your final cut.
Step 4: Make the Cut with a Sharp Utility Knife
Now, use your utility knife to make the final cut along the scored line. Cut with a steady hand and follow the guide closely. It may take a few passes to cut through the vinyl completely, especially if it’s thicker.
Step 5: Cutting Around Obstacles
When you need to cut vinyl siding around obstacles like windows, doors, or fixtures, use tin snips. Here’s how:
- Make a series of straight cuts from the edge of the siding to the corners of the obstacle, ensuring you cut at a slight angle to create a seamless fit.
- Carefully remove the rectangular section of siding, taking your time to avoid any damage to the surrounding siding pieces.
- Use tin snips to make precise cuts along the corners and edges to fit the siding around the obstacle, ensuring a snug and aesthetically pleasing finish that blends seamlessly with the rest of the siding.
Step 6: Cutting for J-Channel or Trim
For cutting vinyl siding to fit J-channels or trim pieces, follow these steps:
- Measure the length needed for the channel or trim, and consider adding a slight allowance for a snug fit.
- Mark the measurement on the siding, making sure your marking is clear and accurate.
- Score the siding along the marking with a utility knife, applying even pressure to create a clean, straight line.
- Carefully cut along the scored line with tin snips, taking your time to ensure the trim or J-channel fits precisely, leaving your siding looking professionally finished.
Step 7: Using a Circular Saw for Long Cuts
When you need to make long, straight cuts in vinyl siding, a circular saw with a fine-tooth blade is the tool of choice. Follow these steps for using a circular saw:
- Adjust the blade depth to just barely cut through the siding.
- Place the siding on a stable surface and secure it with clamps.
- Align the circular saw with your marked cutting line.
- Start the saw and carefully guide it along the line, keeping a steady hand.
Step 8: Safety First and Cleanup
As you finish cutting your vinyl siding, remember to prioritize safety. Wear gloves and safety glasses to protect yourself from sharp edges and debris. Once you’ve completed your cuts, gather and dispose of any leftover vinyl scraps and tools.
Pro Tips for Cutting Vinyl Siding Like a Boss ✂️

Now that you’ve learned the basic steps for cutting vinyl siding, here are some additional tips to ensure your project goes smoothly:
- Use sharp blades: Ensure your utility knife and tin snips have sharp blades to make clean cuts.
- Practice on scrap pieces: If you’re new to cutting vinyl siding, practice on scrap pieces to get a feel for the tools and techniques.
- Maintain a clean workspace: Keeping your work area tidy will help you avoid accidents and make the process more efficient.
- Use a straight edge: For long cuts, consider using a straight edge guide to ensure your cuts are perfectly straight.
- Check for electrical lines: Before using a circular saw, make sure there are no electrical lines behind the area you’re cutting to avoid accidents.
Cut Vinyl Siding Like a Real Pro 🔧
Cutting vinyl siding may seem daunting at first, but with the right tools and a systematic approach, it becomes a manageable task for any homeowner. By following these eight easy-to-follow steps and adhering to safety precautions, you’ll be able to customize your vinyl siding to fit your home’s unique features and achieve a professional-looking result. So, grab your tools and get ready to transform your home’s exterior with confidence!
Contact our expert team of roofers at Shingle and Metal Roofs today and experience speedy turnaround times and unmatched craftsmanship on your home. We’re excited to hear your questions and wants for your next roofing project!